Pandasの列の追加を倍速にした話
Pandasの列の追加を高速化した話です。pandasで1000万件のデータの前処理を高速にするTips集を多分に多分に参考にしています。
ありがとうございます。
以下の修正前のコードの1ループでは、おおよそ数百〜数千行のDataFrameに対して、ema_15のような列を追加しています。
修正前の方法はpandasで1000万件のデータの前処理を高速にするTips集の1章の方法2にあたります。
目次
修正前
修正前のコード
        for tick in list(self.specific_params.values()):
            col = "ema_" + str(tick)
            diff_col = col + "_diff"
            trend_col = col + "_trend"

            ohlcv_with_metrics[col] = ta_ema.append_ema_close(tick)

            # percentage of ema moving
            ohlcv_with_metrics[diff_col] = ohlcv_with_metrics[col].diff() / \
                ohlcv_with_metrics[col] * 100

            # trend of ema moving(ここから下の部分をmapを使うように変更する)
            ohlcv_with_metrics.loc[(ohlcv_with_metrics[diff_col] > 0),
                                   trend_col] = "uptrend"
            ohlcv_with_metrics.loc[~(ohlcv_with_metrics[diff_col] > 0),
                                   trend_col] = "downtrend"
修正前の結果

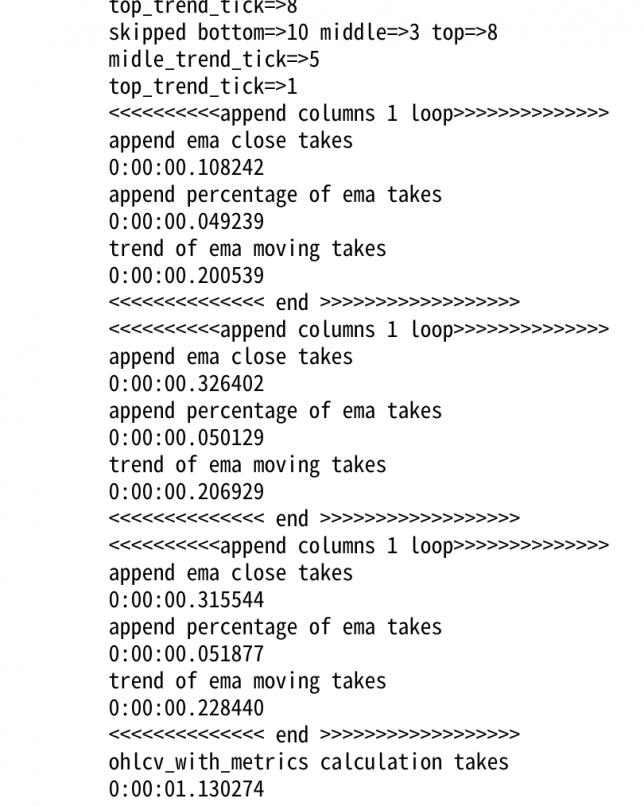
修正前の箇所で注目してほしいのはtrend of ema moving takesの真下の実行時間です。
上から順に
0.200539秒
0.206929秒
0.228440秒
かかっていますね。
修正後
修正後のコード
        for tick in list(self.specific_params.values()):
            print("<<<<<<<<<>>>>>>>>>>>>>")
            col = "ema_" + str(tick)
            diff_col = col + "_diff"
            trend_col = col + "_trend"

            ohlcv_with_metrics[col] = ta_ema.append_ema_close(tick)
            print("append ema close takes")
            print(datetime.now() - exec_start_time)
            exec_start_time = datetime.now()

            # percentage of ema moving
            ohlcv_with_metrics[diff_col] = ohlcv_with_metrics[col].diff() / \
                ohlcv_with_metrics[col] * 100

            print("append percentage of ema takes")
            print(datetime.now() - exec_start_time)
            exec_start_time = datetime.now()

            # trend of ema moving(ここから下の部分が変更箇所)
            ohlcv_with_metrics.loc[:, trend_col] = ohlcv_with_metrics[diff_col].map(
                self.create_trend_col)
            print("trend of ema moving takes")
            print(datetime.now() - exec_start_time)
            print("<<<<<<<<<<<<<< end >>>>>>>>>>>>>>>>>>")

        return ohlcv_with_metrics

    def create_trend_col(self, diff):
        if diff > 0:
            return "uptrend"
        else:
            return "downtrend"
trend_colを追加する際にmap関数を使うように変更しています。
map関数は先程の”uptrend”か”downtrend”かを判定するだけのメソッドで、最初のコードから切り出しています。
修正後の結果

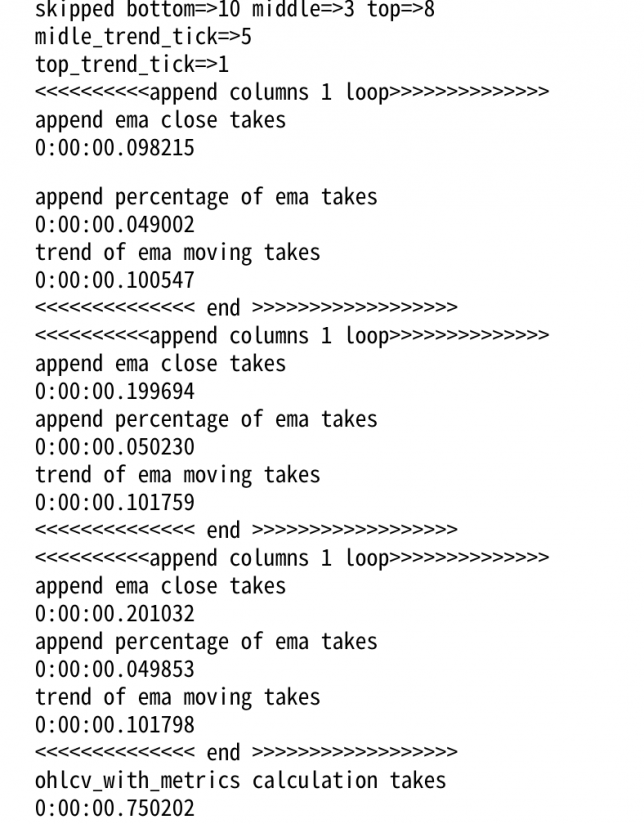
修正後の実行時間は上から順に
0.100547秒
0.101759秒
0.101798秒
と倍速になっていることがわかりますね!めでたしめでたし!
参考


コメント